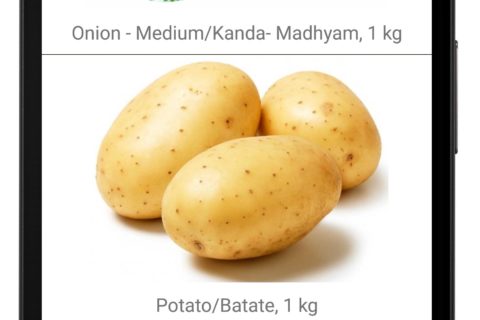
As we know ListView component is deprecated so the best alternative is to use the React-native FlatList component it supports both vertical and horizontal dimension view, also support both Android and IOS device, it support Header and Footer support also we cannot use other libraries for pull to refresh it support pull to refresh, scroll loading, scroll to index, let’s take example
This is the basic syntax of FlatList:
<FlatList data={[{name: 'Tom'}, {name: 'Jerry'}]}
renderItem={({item}) => <Text>{item.name}</Text>} />
This will display Tom and Jerry values of key name
To explain this in detail, we need to start with fetch call, to display data in FlatList
Fetch call
Create one method to call fetch API call and call this method componentDidMount() method of react-native this will call at app first-time start
constructor(props) {
super(props);
     this.getListCall= this.getListCall.bind(this);
     this.GetListItem= this.GetListItem.bind(this);
     this.state = {
        JSONResult: "",
     }
}

componentDidMount(){
   this.getListCall();
}

getListCall(){
   var that = this;
   var url = "https://demo8411001.mockable.io/dataList";
   console.log("-----------url:"+url);

   fetch(url,{method: 'GET'}).then(function (response) {
    return response.json();
   }).then(function (result) {
     if(result.status.response === "success"){
      that.setState({
      JSONResult: result.data_list,
    });
  }
   console.log(result.data_list);
}).catch(function (error) {
   console.log("-------- error ------- "+error);
   alert("result:"+error)
});
}
Now our response JSON is as follows
{
 "status": {
   "response": "success",
   "message": "Product Fetch Successfully"
 },
"data_list": {
  "product_list": [
    {
     "pid": "p001",
     "p_title": "Tomato Hybrid/Tomato Sankarit, 500 gm",
     "p_desc": "These tomatoes are fresh and juicy in texture and they tend to last much longer than pure breed tomatoes.",
     "p_imageurl": "https://techup.co.in/wp-content/uploads/2015/07/tomato_162399647.jpg",
     "p_price": 9.00
    },
    {
     "pid": "p002",
     "p_title": "Onion - Medium/Kanda- Madhyam, 1 kg",
     "p_desc": "Onion is a vegetable which is almost like a staple in Indian food. This is also known to be one of the essential ingredients of raw salads.",
     "p_imageurl": "https://techup.co.in/wp-content/uploads/2017/06/onion-1.jpg",
     "p_price": 15.00
    }
  ]
 }
}
To display these JSON data use FlatList as follows
before that, I suggest you install image loader library component by using the following command in the command line
npm install react-native-image-progress

npm install react-native-progress
render() {
   return (
       <View style={styles.container}>
       <FlatList
         data={ this.state.JSONResult.product_list }
         ItemSeparatorComponent = {this.ItemSeparatorLine}
         renderItem={({item}) =>
       <TouchableOpacity activeOpacity={0.9} onPress={this.GetListItem.bind(this, item.p_title)}>
       <View style={styles.container} >
         <Image
          source={{ uri: item.p_imageurl }}
          indicator={ProgressBar}
          indicatorProps={{
             size: 80,
             borderWidth: 0,
             color: '#006994',
             unfilledColor: '#006994'
        }}
   style={{
      width: 320,
      height: 240,
      alignItems: 'center',
      justifyContent: 'center',
  }}/>
   <Text style={styles.welcome} > {item.p_title} </Text>
   </View>
   </TouchableOpacity>
  }
   keyExtractor={(item, index) => index}
   />
  </View>
  );
}
After this, response data had successfully parse and saved this response in the state then use that list from the response object in FlatList component now we will be going to handle on click to do this we have to use the react-native TouchableOpacity onPress method its very simple create another method GetListItem and call this method as follows
<TouchableOpacity activeOpacity={0.9} onPress={this.GetListItem.bind(this, item.p_title)}>
activeOpacity props handle onPress opacity animation
let’s see whole js file code so that we can understand clearly
import React, { Component } from 'react';
import {
   Platform,
   StyleSheet,
   Text,
   View,
   ScrollView,
   TextInput,
   FlatList,
   Alert,
   TouchableOpacity,
} from 'react-native';

import Image from 'react-native-image-progress';
import ProgressBar from 'react-native-progress';

type Props = {};
export default class App extends Component<Props> {

constructor(props) {
  super(props);
   this.getListCall= this.getListCall.bind(this);
   this.GetListItem= this.GetListItem.bind(this);
   this.state = {
    JSONResult: "",
   }
}

componentDidMount(){
  this.getListCall();
}

getListCall(){
var that = this;
var url = "https://demo8411001.mockable.io/dataList";
console.log("-----------url:"+url);
fetch(url,{method: 'GET'}).then(function (response) {
    return response.json();
  }).then(function (result) {

  if(result.status.response === "success"){
   that.setState({
     JSONResult: result.data_list,
   });
  }
console.log(result.data_list);
 }).catch(function (error) {
   console.log("-------- error ------- "+error);
  alert("result:"+error)
 });
}

GetListItem (name) {
  Alert.alert(name);
}

ItemSeparatorLine = () => {
  return (
    <View
    style={{height: .5,width: "100%",backgroundColor: "#111a0b",}}
    />
  );
}

render() {
  return (
    <View style={styles.container}>
    <FlatList
      data={ this.state.JSONResult.product_list }
      ItemSeparatorComponent = {this.ItemSeparatorLine}

  renderItem={({item}) =>
   <TouchableOpacity activeOpacity={0.9} onPress={this.GetListItem.bind(this, item.p_title)}>
   <View style={styles.container} >

   <Image
     source={{ uri: item.p_imageurl }}
     indicator={ProgressBar}
     indicatorProps={{
     size: 80,
     borderWidth: 0,
     color: 'rgba(150, 150, 150, 1)',
     unfilledColor: 'rgba(200, 200, 200, 0.2)'
   }}
  style={{
     width: 320,
     height: 240,
     alignItems: 'center',
     justifyContent: 'center',
 }}/>


   <Text style={styles.welcome} > {item.p_title} </Text>
   </View>
</TouchableOpacity>
}
keyExtractor={(item, index) => index}
/>
</View>
);
}
}

const styles = StyleSheet.create({
container: {
  flex: 1,
  justifyContent: 'center',
  alignItems: 'center',
  backgroundColor: '#FFFFFF',
},
welcome: {
  fontSize: 20,
  textAlign: 'center',
  margin: 10,
},
instructions: {
  textAlign: 'center',
  color: '#333333',
  marginBottom: 5,
},
});

Thank you 🙂 enjoy coding…


Hi, can you show a demo with an API using POST and an authorization token? I used your boilerplate code but if I modify the API request to a POST call with authorization headers, it fails.
Ya sure I will give upload new post for POST request with Authorization token
For now, you can go through this Article https://techup.co.in/react-native-api-call-how-to-parse-response-data/
I like this web blog its a master peace ! Glad I detected this on google .
Thank you 🙂
I am genuinely thankful to the owner of this website who has shared this great article at here.
Thank you