React-native form UI design
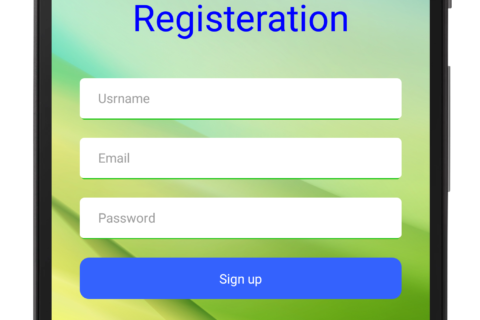
Hi guys, in this article we learn about React-native form UI design with TextInput, Button, etc
so let us start with the new project to do this
- Create a new project
react-native init TestProject
after successfully created project i am using App.js to design this page but i suggest you to create new Register.js and use Stack navigation and defined these Register.js in App.js to know more about Stack navigation you can see my stack navigation tutorial Click here
2. Lets import following component
import React, {Component} from 'react';
import {Platform, StyleSheet, Text, TextInput, View, Dimensions, TouchableOpacity,
 Button, Alert, Image, ImageBackground, StatusBar} from 'react-native';
3. Create constructor in the main class
Initialize state in that constructor and define field which we want to save, we will save form fields in this state by using the onChangeText listener
constructor(props) {
  super(props);

     var {height, width} = Dimensions.get('window');
     this.state = {screenHeight: height, screenWidth: width,
     Usrname: '',
     email : '',
     password: '',};
}
I have use Dimensions.get(‘window’) to get window width as well as height we can set height and width of view on the basis of these window width and height
4. Add Background image
To add background imag, create a image in your root directory and paste image into it then we have to use ImageBackground component, i am giving width and height in percentage as seen below
<ImageBackground
  source={require('./image/ic_background.jpg')}
  imageStyle={{resizeMode: 'stretch'}}
  style={{width: '100%', height: '100%'}}>

<View> // do something ...</View>

</ImageBackground>
After that i have change status bar color like below
<StatusBar
  backgroundColor="#0B7600"
  barStyle="light-content"/>
Then add simple view inside ImageBackground
<View style={styles.container}>
//do something..

</View>
Then inside this view add Heading text and TextInputLayout as follows:
<View style={styles.container}>

    <Text style={styles.input}>Registeration</Text>

   <View style={styles.inputContainer}>
       <TextInput style={styles.inputs}
        placeholder="Usrname"
        keyboardType="email-address"
        underlineColorAndroid='transparent'
        onChangeText={(Usrname) => this.setState({Usrname})}/>
   </View>

   <View style={styles.inputContainer}>
       <TextInput style={styles.inputs}
        placeholder="Email"
        keyboardType="email-address"
        underlineColorAndroid='transparent'
        onChangeText={(email) => this.setState({email})}/>
   </View>

   <View style={styles.inputContainer}>

    <TextInput style={styles.inputs}
     placeholder="Password"
     secureTextEntry={true}
     underlineColorAndroid='transparent'
     onChangeText={(password) => this.setState({password})}/>
   </View>

   <TouchableOpacity style={styles.submitButtonText} onPress={() => this.onClickListener('sign_up')}>
     <Text style={styles.signUpText}>Sign up</Text>
  </TouchableOpacity>
</View>
I have added TextInputLayout for username, email, password and one button for sign up
also i have added onClickListener for that sign up button and pass id from that
this will call onClick method so use following method
onClickListener = (view_id) => {
   Alert.alert(this.state.email, "View_id "+view_id);
}
add this above method outside the render method
5. Complete code as given below:
import React, {Component} from 'react';
import {Platform, StyleSheet, Text, TextInput, View, Dimensions,
TouchableOpacity, Button, Alert, Image, ImageBackground, StatusBar} from 'react-native';

export default class App extends Component<Props> {

  constructor(props) {
    super(props);

    var {height, width} = Dimensions.get('window');
    this.state = {screenHeight: height, screenWidth: width,
    Usrname: '',
    email : '',
    password: '',};
}

onClickListener = (viewId) => {
   Alert.alert(this.state.Usrname+" "+this.state.email+" "+this.state.password , "View_id "+viewId);
}

render() {
   return (
       <ImageBackground
          source={require('./image/ic_background.jpg')}
          imageStyle={{resizeMode: 'stretch'}}
          style={{width: '100%', height: '100%'}}>

       <StatusBar
          backgroundColor="#0B7600"
          barStyle="light-content"/>

       <View style={styles.container}>

          <Text style={styles.input}>Registeration</Text>

       <View style={styles.inputContainer}>
          <TextInput style={styles.inputs}
           placeholder="Usrname"
           keyboardType="email-address"
           underlineColorAndroid='transparent'
           onChangeText={(Usrname) => this.setState({Usrname})}/>
       </View>
       <View style={styles.inputContainer}>
          <TextInput style={styles.inputs}
           placeholder="Email"
           keyboardType="email-address"
           underlineColorAndroid='transparent'
           onChangeText={(email) => this.setState({email})}/>
       </View>

       <View style={styles.inputContainer}>
         <TextInput style={styles.inputs}
           placeholder="Password"
           secureTextEntry={true}
           underlineColorAndroid='transparent'
           onChangeText={(password) => this.setState({password})}/>
       </View>

       <TouchableOpacity style={styles.submitButtonText} onPress={() => this.onClickListener('sign_up')}>
          <Text style={styles.signUpText}>Sign up</Text>
       </TouchableOpacity>

      </View>
    </ImageBackground>
   );
  }
}

const styles = StyleSheet.create({
  container: {
     flex: 1,
     justifyContent: 'center',
     alignItems: 'center',
    },
  input: {
     margin: 15,
     fontSize: 40,
     marginBottom : 40,
     color : 'blue'
    },
  submitButton: {
     backgroundColor: '#7a42f4',
     padding: 10,
     margin: 15,
     height: 60,
    },
  submitButtonText:{
     color: '#FFFFFF',
     backgroundColor: '#3462FD',
     width:350,
     height:45,
     borderRadius:10,
     justifyContent: 'center',
     alignItems: 'center'
    },
  signUpText:{
     color: '#FFFFFF',
     alignItems: 'center'
  },
  inputContainer: {
     borderBottomColor: '#05C203',
     backgroundColor: '#FFFFFF',
     borderRadius:5,
     borderBottomWidth: 1,
     width:350,
     height:45,
     marginBottom:20,
     flexDirection: 'row',
     alignItems:'center'
  },
  inputs:{
     height:45,
     marginLeft:16,
     borderBottomColor: '#FFFFFF',
     flex:1,
  },
})
Layout:-
Thank you..enjoy coding.. 🙂


I’ve been surfing on-line greater than three hours these days, but I never found any fascinating article like yours. It is pretty price enough for me. In my opinion, if all website owners and bloggers made just right content material as you probably did, the web can be much more useful than ever before.
Thanks a lot 🙂
Hey! This is my first visit to your blog! We
are a team of volunteers and starting a new initiative in a community in the same niche.
Your blog provided us useful information to work on. You have
done a outstanding job!
Thank a lot ?
I’d always want to be update on new content on this site, saved to my bookmarks! .
Thank you 😊 you can also subscribe by email