React Native has gained popularity as a powerful framework for building cross-platform mobile applications with a native look and feel. In this article, we are going to learn about Building E-commerce Image Viewer in React Native. we will explore how to create an engaging and interactive image view component for an e-commerce app using React Native. Images play a vital role in showcasing products in online stores, and providing a seamless and visually appealing image-viewing experience is crucial for enhancing user engagement and increasing sales. We will walk through the steps of setting up an image view component and incorporating features like swiping, and thumbnail navigation. By the end of this tutorial, you will have a solid understanding of how to create an impressive image view for your e-commerce app using React Native.

1. Create a new project
Create React Native project using the following command. check this post to setup React Native on your machine
react-native init ProjectName
2. Create a new image view component
I have created a new image component. in which I have added a slider and thumbnail images with navigation. let’s see FullScreenImageView.js
As you can see in the code, I have used ScrollView onScroll property to add page functionality
import React, {useState} from 'react';
import {
  View,
  Dimensions,
  Image,
  StyleSheet,
  StatusBar,
  SafeAreaView,
  ScrollView,
  TouchableOpacity,
} from 'react-native';

function FullScreenImageView(props) {
  const [sliderState, setSliderState] = useState({currentPage: 0});
  const [imageList, setImageList] = useState(props.arr);
  const [selectedIndex, setSelectedIndex] = useState(0);
  const scrollviewRef = React.useRef();
  const indicatorScrollviewRef = React.useRef();
  const width = Dimensions.get('window').width;
  const height = Dimensions.get('window').height;
  const [zoomEndable, setZoomEndable] = useState(false);

  React.useEffect(() => {
    // Used to set preSelected image using "selectedIndex"
    // updateImageList(selectedIndex);
    scrollviewRef.current?.scrollTo({
      x: width * selectedIndex,
      animated: false,
    });
  }, []);

  const setSliderPage = event => {
    const {currentPage} = sliderState;
    const {x} = event.nativeEvent.contentOffset;
    const indexOfNextScreen = Math.floor(Math.floor(x) / Math.floor(width));
    if (indexOfNextScreen !== currentPage) {
      setSliderState({
        ...sliderState,
        currentPage: indexOfNextScreen,
      });
    }

    updateImageList(indexOfNextScreen);
    scrollForword(currentPage - 0.8);
  };

  const updateImageList = indexx => {
    const newState = imageList.map((item, index) => {
      return {...item, selected: false};
    });
    var objIndex = newState.findIndex((item, index) => index == indexx);
    if (objIndex >= 0) {
      newState[objIndex].selected = true;
      setImageList(newState);
    }
  };

  const scrollForword = currentPage => {
    const newScrollXX = currentPage * 150;
    indicatorScrollviewRef.current?.scrollTo({x: newScrollXX, animated: false});
  };

  const renderProductImages = (item, index) => {
    const onSelectImage = (item, screenIndex) => {
      var originalList = [...props.arr];
      let shapeArr = originalList.map((item, index) => {
        item.selected = false;
        return item;
      });
      let final = shapeArr.map((item, index) => {
        if (index === screenIndex) {
          item.selected = true;
        }

        return item;
      });
      setImageList(final);
      scrollviewRef.current?.scrollTo({
        x: width * screenIndex,
        animated: false,
      });
    };
    return (
      <TouchableOpacity
        activeOpacity={0.8}
        onPress={() => onSelectImage(item, index)}
        key={item.id}>
        <View
          style={[
            styles.paginationDots,
            {
              borderWidth: item.selected ? 2 : 0.5,
              borderColor: item.selected ? 'red' : 'grey',
            },
          ]}>
          <Image source={{uri: item.url}} style={styles.imageSmallStyle} />
        </View>
      </TouchableOpacity>
    );
  };

  return (
    <SafeAreaView style={{flex: 1, backgroundColor: 'white'}}>
      <View style={{flex: 1}}>
        <StatusBar barStyle="dark-content" />
        <ScrollView
          ref={scrollviewRef}
          style={{flex: 1}}
          horizontal={true}
          scrollEventThrottle={16}
          pagingEnabled={zoomEndable ? false : true}
          showsHorizontalScrollIndicator={false}
          onScroll={event => {
            setSliderPage(event);
          }}>
          {imageList &&
            imageList.map((item, index) => (
              <TouchableOpacity
                style={{flex: 1, width, height}}
                activeOpacity={1}
                key={item.id}>
                <Image
                  resizeMode="contain"
                  source={{uri: item.url}}
                  style={styles.imageStyle}
                />
              </TouchableOpacity>
            ))}
        </ScrollView>

        <View style={styles.paginationWrapper}>
          <ScrollView horizontal={true} ref={indicatorScrollviewRef}>
            {imageList
              ? imageList.map((item, index) => renderProductImages(item, index))
              : null}
          </ScrollView>
        </View>
      </View>
    </SafeAreaView>
  );
}

const styles = StyleSheet.create({
  imageStyle: {
    height: '70%',
    width: '100%',
  },
  zoomImageStyle: {
    height: '100%',
    width: '100%',
  },
  imageSmallStyle: {
    height: 120,
    width: 90,
  },
  paginationWrapper: {
    alignSelf: 'flex-end',
    backgroundColor: 'white',
    width: '100%',
    justifyContent: 'center',
    alignItems: 'center',
    flexDirection: 'row',
  },
  paginationDots: {
    height: 130,
    width: 100,
    margin: 4,
    //borderRadius: 10 / 2,
    backgroundColor: 'white',
    justifyContent: 'center',
    alignItems: 'center',
  },
  paginationDots2: {
    height: 100,
    width: 100,
    margin: 10,
    //borderRadius: 10 / 2,
    backgroundColor: 'blue',
  },
});

export default FullScreenImageView;
3. Use an e-commerce image view
Import the above component to your screen and pass the image list array to it. I have declared a const array and pass to ImageComponent. you can make API call in useEffect() and set & get a response in useState() hook.
import * as React from 'react';
import {Text, View, StyleSheet, TouchableOpacity} from 'react-native';
import FullScreenImageView from './src/CustomComponents/FullScreenImageView';

const array = [
  {
    id: 1,
    url: 'https://www.techup.co.in/wp-content/uploads/2023/06/4df569d5-cbde-42fa-ad86-677770e2947e.png',
    selected: true,
  },
  {
    id: 2,
    url: 'https://www.techup.co.in/wp-content/uploads/2023/06/fc9550cb-44f9-48b6-be47-352159e822bc.png',
    selected: false,
  },
  {
    id: 3,
    url: 'https://www.techup.co.in/wp-content/uploads/2023/06/4df569d5-cbde-42fa-ad86-677770e2947e.png',
    selected: false,
  },
  {
    id: 4,
    url: 'https://www.techup.co.in/wp-content/uploads/2023/06/fc9550cb-44f9-48b6-be47-352159e822bc.png',
    selected: false,
  },
  {
    id: 5,
    url: 'https://www.techup.co.in/wp-content/uploads/2023/06/4df569d5-cbde-42fa-ad86-677770e2947e.png',
    selected: false,
  },
];

const App = () => {
  return (
    <View style={styles.container}>
      <ImageFullScreen arr={array} />
    </View>
  );
}

export default App;
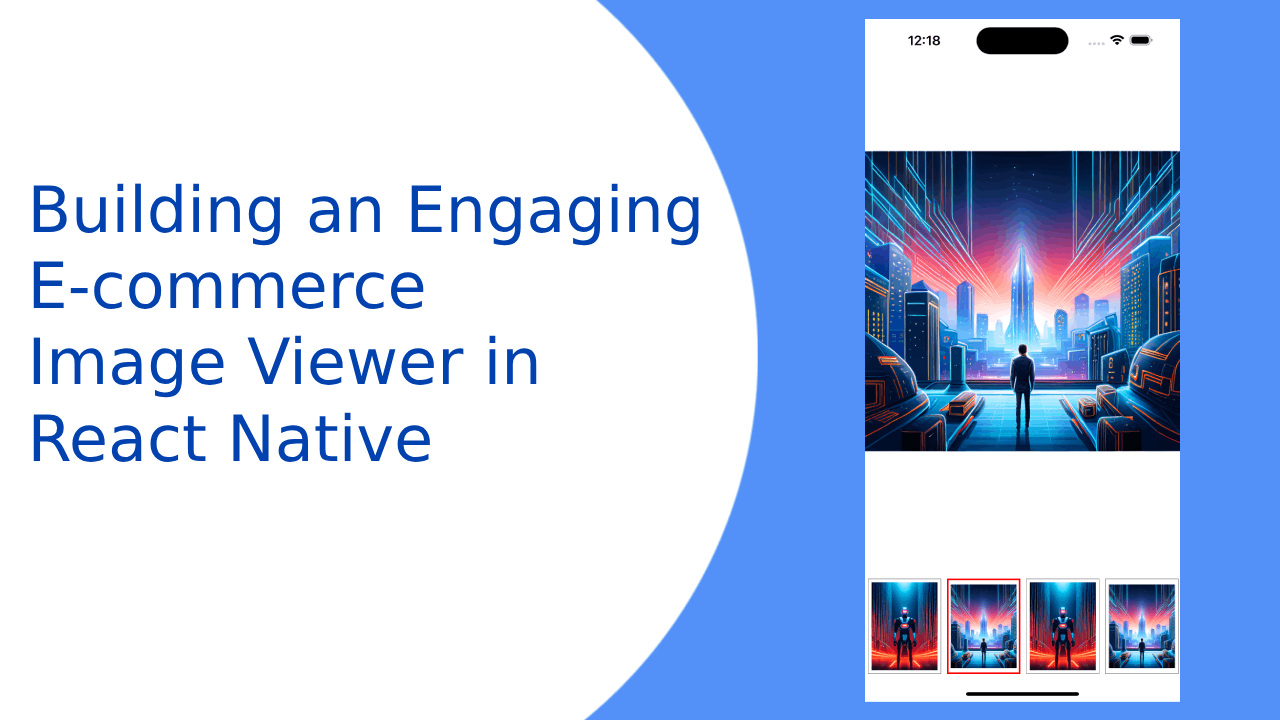
4. Output
Building E-commerce Image Viewer in React Native. In this tutorial, we have delved into the process of creating a captivating e-commerce image viewer in React Native. By leveraging the power of React Native’s cross-platform capabilities, we have built an interactive image-viewing component that enhances the user experience and showcases products in a visually appealing manner. Through the implementation of features like swiping, and thumbnail navigation, we have provided users with a seamless and engaging image browsing experience. With the knowledge gained from this tutorial, you can now apply these techniques to your own e-commerce app, enabling you to present products in a way that captures attention, drives engagement, and ultimately contributes to the success of your online store. Happy coding!
Thank you 🙂