Hi guys, I this article, we are learning about the topic which use to design application UI. developers need to add one view over another this will be useful when you want to add budge icon on Cart icon on the top right corner so we are going to learn about How to put one view over another view React Native. In React Native it’s very easy to place one view on another view. just need to add a position with absolute in view style and put this view below the view on which you want to add. let’s learn with the help of an example.
Check this post for a real cart count example How to put the number at top right corner of the cart icon
1. Create a new project
create a new project using the following comment. in my case, I am using my old project.
react-native init projectName
2. Import the following core components
// import React
import React from 'react';

// import following components from react native
import {
  SafeAreaView,
  View,
  StyleSheet,
} from 'react-native';
3. Add view on another view
I am going to create three views and place these views one over another. make sure you have to put these view one below another otherwise, it will not works properly
const Screen2 = () => {
  return (
    <SafeAreaView style={{flex: 1}}>
      <View style={styles.container}>
        <View style={{width: 200, height: 200, backgroundColor:'red', left: 20, top:20}}/>
        <View style={{width: 200, height: 200, backgroundColor:'blue', position:'absolute', left: 40, top:40}}/>
        <View style={{width: 200, height: 200, backgroundColor:'yellow', position:'absolute', left: 25, top:60}}/>
      </View>
    </SafeAreaView>
  );
};
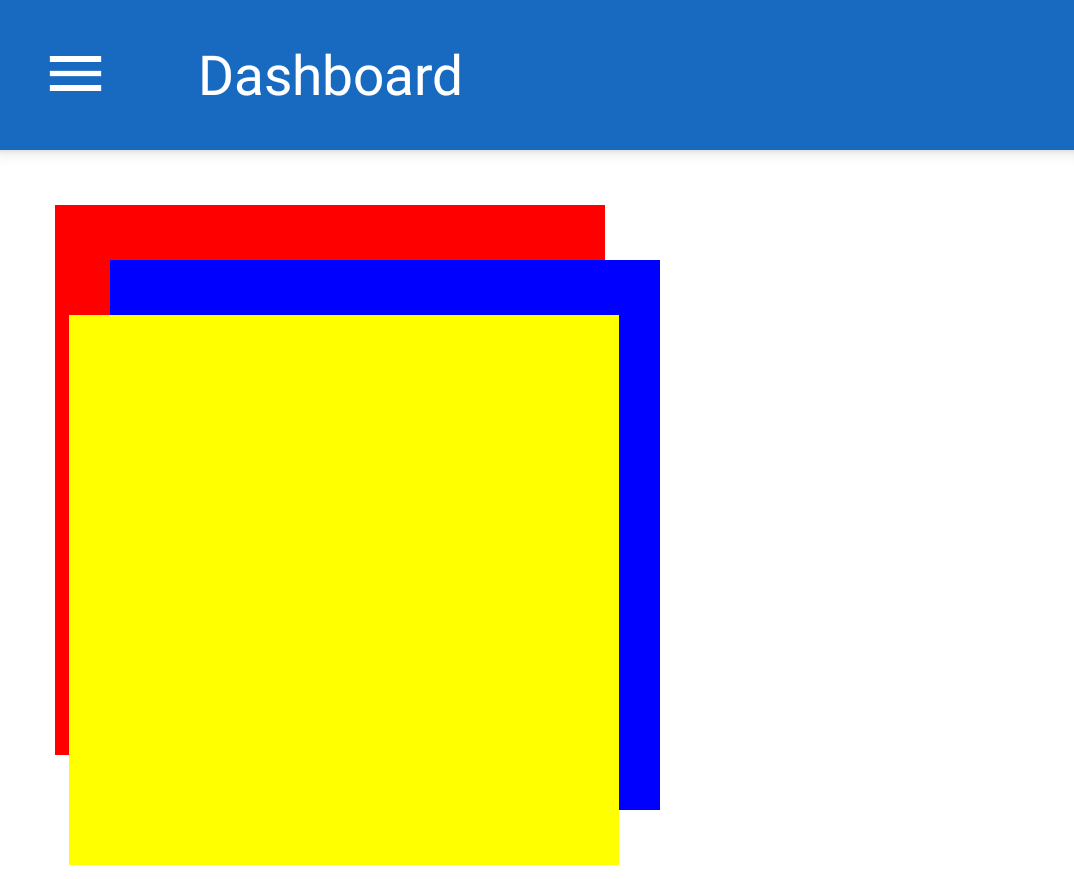
As you can see, to understand properly I have added Inline style here, first view is the bottom view which is defined at the top. the second view will render over the first view. the third view will render over the second view. also, I have added props like left & top to move the view.
4. Full source code
// import React
import React from 'react';

// import following components from react native
import {
  SafeAreaView,
  View,
  StyleSheet,
} from 'react-native';

const Screen2 = () => {
  return (
    <SafeAreaView style={{flex: 1}}>
      <View style={styles.container}>
        <View style={{width: 200, height: 200, backgroundColor:'red', left: 20, top:20}}/>
        <View style={{width: 200, height: 200, backgroundColor:'blue',position:'absolute', left: 40, top:40}}/>
        <View style={{width: 200, height: 200, backgroundColor:'yellow', position:'absolute', left: 25, top:60}}/>
      </View>
    </SafeAreaView>
  );
};

export default Screen2;

const styles = StyleSheet.create({
  container: {
    backgroundColor: 'white',
  },

});
5. Output:
Here’s the output of the above source code.
Just keep in mind while placing one view on another upper view should place below while writing code otherwise it will display an outline of the bottom view on the upper view which is a bug.
Thank you 🙂


Very informative and useful tips with excellent presentation. Looking forward to lots more articles about React Native and Thanks for sharing solution and such informative article.
Thank you. stay connected. You can subscribe to our blog so that you will get an email notifications for upcoming articles.