
Before start programming on react-native, we have to understand the basics of react-native like React-native folder structure, imports, methods
React-native from basics, folder structure, code structure, imports, methods
To create new project use following command:
react-native init ProjectName
Here is my React-native folder structure
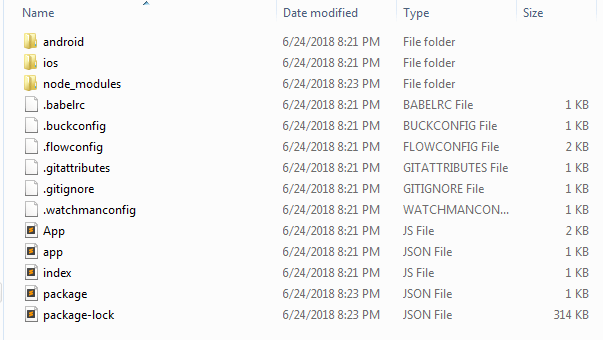
- Android folder:- This folder contains Android Java code
- IOS folder:- This folder contains IOS code
- Node_modules folder:- This contains nodeJS modules also contain react-native libraries which we will be going to install in future
- App.json:- This file is used to configuring parts of your app that don’t belong in code.
- index.js file:- This is an entry file in your app
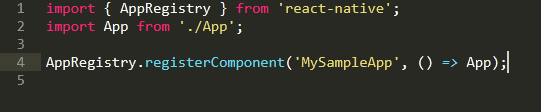
This file automatically generates, as we can see in above screenshot it uses AppRegistry from react-native and register it with App.js file which is imported as import App from ‘./App’; and register as follows: AppRegistry.registerComponent(‘MySampleApp’, () => App);
- package.json:- This file usually place in project root folder, it contains various metadata related to project, the first section contains App name, version, scripts the second section contain all dependencies relevant to project. Next, to that contain devDependances and its versions
{
"name": "MySampleApp",
"version": "0.0.1",
"private": true,
"scripts": {
"start": "node node_modules/react-native/local-cli/cli.js start",
"test": "jest"
},
"dependencies": {
"react": "16.3.1",
"react-native": "0.55.3"
},
"devDependencies": {
"babel-jest": "22.4.3",
"babel-preset-react-native": "4.0.0",
"jest": "22.4.3",
"react-test-renderer": "16.3.1"
},
"jest": {
"preset": "react-native"
}
}
- App.js file:- You can put your code into this file, also you can declare different screens on this page using Stack Navigation
import React, { Component } from 'react';
import {
Platform,
StyleSheet,
Text,
View
} from 'react-native';

const instructions = Platform.select({
   ios: 'Press Cmd+R to reload,\n' +
    'Cmd+D or shake for dev menu',
   android: 'Double tap R on your keyboard to reload,\n' +
    'Shake or press menu button for dev menu',
});

type Props = {};
export default class App extends Component<Props> {
render() {
    return (
      <View style={styles.container}>
         <Text style={styles.welcome}>
          Welcome to React Native!
         </Text>
         <Text style={styles.instructions}>
          To get started, edit App.js
         </Text>
      <Text style={styles.instructions}>
       {instructions}
      </Text>
    </View>
   );
  }
}

const styles = StyleSheet.create({
   container: {
     flex: 1,
     justifyContent: 'center',
     alignItems: 'center',
     backgroundColor: '#F5FCFF',
   },
  welcome: {
     fontSize: 20,
     textAlign: 'center',
     margin: 10,
   },
instructions: {
     textAlign: 'center',
     color: '#333333',
     marginBottom: 5,
  },
});
Let’s talk about react-native code structure
1.React-native imports
consider above App.js code, firstly there are imports at the top, we will add another external components or libraries as well as other custom views in this section
View is in another directory and you want to access the file from root folder then imports as like follow:
import ImageViewScreen from './components/ImageViewScreen';
if your view is in the same directory and you are not in root folder then imports as like follow:
import ImageViewScreen from './ImageViewScreen';
if your view is in another directory then and you are not in root folder imports as like follow:
import ImageViewScreen from '../components/ImageViewScreen';
2. React-native main call
All code in js file is inside of the main call make sure this class name is same as the class file name we can add our methods inside this class this class contain one render method which renders our code and display data using return method
from next article, we will start coding i.e how to use Stack navigation, how to make API call how to parse data, how to transfer data from one screen to another screen also learn react UI components.


Regards for all your efforts that you have put in this. very interesting info .
Thank you 🙂
Really clean web site, appreciate it for this post.
Thanks 🙂
Hey very cool blog!! Man .. Beautiful .. Amazing .. I will bookmark your site and take the feeds also…I’m happy to find so many useful info here in the post, we need work out more techniques in this regard, thanks for sharing. . . . . .
Thanks a lot 🙂