
In this Article, we learn about how to implement React-native custom Navigation Drawer / Sidebar, we are going to use react-navigation to make react-native navigation drawer, so let’s start step by step we have to create a new project and install some libraries, This Example is for React Navigation 3.+ and React-native version <60 and >60

1. Create a new project
react-native init NavigationDrawerExample
before this, I request everyone to go to through this tutorial after creating project goto to project root directory and install the following libraries
npm install react-navigation --save
npm install react-navigation-drawer
npm install react-navigation-stack
npm install react-native-reanimated
npm install react-native-screens
npm install react-native-vector-icons
npm install react-native-gesture-handler --save
Note:- If you are using React-native version <0.60.0 then do following otherwise you don’t run following link command React-native >0.60.0 and above versions support auto-linking
In above command –save is optional after installation of this library we need to link this to our project using the following command, this library will help you to swap navigation bar with touch gesture
react-native link react-native-gesture-handler
I have updated my project to React-native version 60.0, so here are my Package.json dependencies:
 "dependencies": {
    "react": "16.8.6",
    "react-native": "0.60.0",
    "react-native-elements": "^1.2.7",
    "react-native-gesture-handler": "^1.5.2",
    "react-native-reanimated": "^1.4.0",
    "react-native-screens": "^2.0.0-alpha.22",
    "react-native-vector-icons": "^6.6.0",
    "react-navigation": "^4.0.10",
    "react-navigation-drawer": "^2.3.3",
    "react-navigation-slide-from-right-transition": "^1.0.4",
    "react-navigation-stack": "^1.10.3"
  },
2. Folder structure
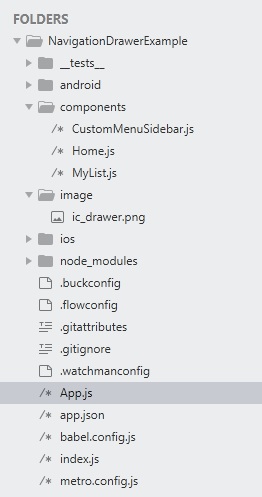
As we see in the folder structure I have created components folder in this I have created CustomMenuSidebar.js, Home.js, MyList.js let’s start with CustomMenuSidebar.js
3. CustomMenuSidebar
Here is the code for custom navigation component, please read comments in below code
import React, { Component } from 'react';
import { View, StyleSheet, Image, Text } from 'react-native';
import { Icon } from 'react-native-elements';

// Define a variable for selected screen index
global.selectedScreenIndex = 0;

export default class CustomMenuSidebar extends Component {
  constructor() {
    super();
    // Main Top Large Image of the Custom Sidebar
    this.headerImage = 'https://www.techup.co.in/wp-content/uploads/2019/02/techup_logo_final_wb.jpg';
    // OptionsList which will used in map loop in render method
    this.optionsList = [
      {
        navOptionIcon: 'camera',
        navOptionTitle: 'Home',
        screenToNavigate: 'homeScreen',
      },
      {
        navOptionIcon: 'image',
        navOptionTitle: 'MyList',
        screenToNavigate: 'myList',
      }
    ];
  }
  render() {
    return (
      <View style={styles.containerSideMenu}>
        {/*Navigation Bar header  Image */}
        <Image
          source={{ uri: this.headerImage }}
          style={styles.headerStyle}
        />
        {/*Divider between header Image and options*/}
        <View
          style={{
            width: '100%',
            height: 1,
            backgroundColor: '#e2e2e2',
            marginTop: 15,
          }}
        />
        {/*Setting up Navigation Options from jsonArray using loop*/}
        <View style={{ width: '100%' }}>
          {this.optionsList.map((item, key) => (
            <View
              style={{
                flexDirection: 'row',
                alignItems: 'center',
                paddingTop: 10,
                paddingBottom: 10,
                backgroundColor: global.selectedScreenIndex === key ? '#e0dbdb' : '#ffffff',
              }}>
              <View style={{ marginRight: 10, marginLeft: 20 }}>
                <Icon name={item.navOptionIcon} size={25} color="#808080" />
              </View>
              <Text
                style={{
                  fontSize: 15,
                  color: global.selectedScreenIndex === key ? 'blue' : 'black',
                }}
                onPress={() => {
                  global.selectedScreenIndex = key;
                  this.props.navigation.navigate(item.screenToNavigate);
                }}>
                {item.navOptionTitle}
              </Text>
            </View>
          ))}
        </View>
      </View>
    );
  }
}
const styles = StyleSheet.create({
   headerStyle: {
    resizeMode: 'cover',
    width: 150,
    height: 150,
  },
  containerSideMenu: {
    width: '100%',
    height: '100%',
    backgroundColor: '#fff',
    alignItems: 'center',
    paddingTop: 20,
  }

});
As we see in the above file we create a layout for NavBar which we will use in App.js during navigation drawer setup before going toward App.js first have to create Home.js and MyList.js as follows
4. Home.js
import React, {Component} from 'react';
import {Platform, StyleSheet, Text, View,StatusBar} from 'react-native';

const instructions = Platform.select({
  ios: 'Press Cmd+R to reload,\n' + 'Cmd+D or shake for dev menu',
  android:
    'Double tap R on your keyboard to reload,\n' +
    'Shake or press menu button for dev menu',
});

//Define a color for toolbar
global.backgroundColor = '#176abf';

type Props = {};
export default class Home extends Component<Props> {
  render() {
    return (
      <View style={styles.container}>

        <Text style={styles.welcome}>Welcome to Home!</Text>
        <Text style={styles.instructions}>To get started, edit App.js</Text>
        <Text style={styles.instructions}>{instructions}</Text>
      </View>
    );
  }
}

const styles = StyleSheet.create({
  container: {
    flex: 1,
    justifyContent: 'center',
    alignItems: 'center',
    backgroundColor: '#F5FCFF',
  },
  welcome: {
    fontSize: 20,
    textAlign: 'center',
    margin: 10,
  },
  instructions: {
    textAlign: 'center',
    color: '#333333',
    marginBottom: 5,
  },
});
5. MyList
import React, {Component} from 'react';
import {Platform, StyleSheet, Text, View} from 'react-native';

const instructions = Platform.select({
  ios: 'Press Cmd+R to reload,\n' + 'Cmd+D or shake for dev menu',
  android:
    'Double tap R on your keyboard to reload,\n' +
    'Shake or press menu button for dev menu',
});

type Props = {};
export default class MyList extends Component<Props> {
  render() {
    return (
      <View style={styles.container}>
        <Text style={styles.welcome}>Welcome to MyList!</Text>
        <Text style={styles.instructions}>To get started, edit App.js</Text>
        <Text style={styles.instructions}>{instructions}</Text>
      </View>
    );
  }
}

const styles = StyleSheet.create({
  container: {
    flex: 1,
    justifyContent: 'center',
    alignItems: 'center',
    backgroundColor: '#F5FCFF',
  },
  welcome: {
    fontSize: 20,
    textAlign: 'center',
    margin: 10,
  },
  instructions: {
    textAlign: 'center',
    color: '#333333',
    marginBottom: 5,
  },
});
Added same code for both screens just for explanation, now let’s see App.js
6. App.js
//This is an example code for Navigation Drawer with Custom Side bar//
//This Example is for React Navigation 3.+//
import React, { Component } from 'react';
// import all basic components as follows
import {
  View,
  StyleSheet,
  Dimensions,
  Image,
  TouchableOpacity,
  Platform,
  Text,
  StatusBar
} from 'react-native';

 //++++++++++++++++++++For React-native <0.60.0 use following imports++++++++++++++++++++++++++
//Import required react-navigation component with requried
//import {
 // createDrawerNavigator,
 // createStackNavigator,
 // createAppContainer,
//} from 'react-navigation';
//++++++++++++++++++++For React-native >0.60.0 or above use following imports++++++++++++++++++++++++++
import {createAppContainer} from 'react-navigation';
import {createDrawerNavigator} from 'react-navigation-drawer';
import {createStackNavigator} from 'react-navigation-stack';

//Import all the menu screens
import Screen1 from '../components/Home';
import Screen2 from '../components/MyList';

//Import Custom Sidebar component
import CustomMenuSidebar from '../components/CustomMenuSidebar';

//Define a global color for toolbar
global.backgroundColor = '#176abf';


//Navigation Drawer button Structure for all screen
class NavigationDrawerButton extends Component {
  //Top Navigation Header with Donute Button
  toggleDrawer = () => {
    //Props to open/close the drawer
    this.props.navigationProps.toggleDrawer();
  };
  render() {
    return (
      <View>
      <StatusBar backgroundColor='#1562b0' barStyle='light-content' />
      <View style={{ flexDirection: 'row' }}>

        <TouchableOpacity onPress={this.toggleDrawer.bind(this)}>
          {/*Donute Button Image */}
          <Image
            source={require('../image/ic_drawer.png')}
            style={{ width: 25, height: 25, marginLeft: 15 }}
          />
        </TouchableOpacity>
      </View>
      </View>
    );
  }
}
 //-------------------------Set Navigation Drawer options as follows-------------------------------------
//First Option of Navigation Drawer
const FirstOption_StackNavigator = createStackNavigator({

  First: {
    screen: Screen1,
    navigationOptions: ({ navigation }) => ({
      title: 'Home',
      headerLeft: <NavigationDrawerButton navigationProps={navigation} />,
      headerStyle: {
        backgroundColor: backgroundColor,
      },
      headerTintColor: '#fff',
    }),
  },
});

//Second Option of Navigation Drawer
const Second_StackNavigator = createStackNavigator({

  Second: {
    screen: Screen2,
    navigationOptions: ({ navigation }) => ({
      title: 'My List',
      headerLeft: <NavigationDrawerButton navigationProps={navigation} />,

      headerStyle: {
        backgroundColor: backgroundColor,
      },
      headerTintColor: '#fff',
    }),
  },
});

//----------------------------------Define screens using createDrawerNavigator------------------------
//Drawer Navigator Which will provide the structure of our App
const DrawerNavigator = createDrawerNavigator(
  {
    //Drawer Optons and indexing
    homeScreen: {
      screen: FirstOption_StackNavigator,

    },
    myList: {
      screen: Second_StackNavigator,

    }
  },
  {
    //Custom sidebar menu we have to provide our CustomMenuSidebar
    contentComponent: CustomMenuSidebar,
    //Set sidebar width
    drawerWidth: Dimensions.get('window').width - 130,
  }
);
export default createAppContainer(DrawerNavigator);
Note:- If you are using React-native version <0.60.0 then do following changes
After completing this just goto android folder –> app –> src –> main –> java –> com –> projectName –> MainActivity.java we have to @Override on method createReactActivityDelegate and add following return code in it
  return new ReactActivityDelegate(this, getMainComponentName()) {
            @Override
            protected ReactRootView createRootView() {
                return new RNGestureHandlerEnabledRootView(MainActivity.this);
            }
        };
MainActivity.java looks like follows
package com.navigationdrawerexample;

import com.facebook.react.ReactActivity;
import com.facebook.react.ReactActivityDelegate;
import com.facebook.react.ReactRootView;
import com.swmansion.gesturehandler.react.RNGestureHandlerEnabledRootView;

public class MainActivity extends ReactActivity {

    /**
     * Returns the name of the main component registered from JavaScript.
     * This is used to schedule rendering of the component.
     */
    @Override
    protected String getMainComponentName() {
        return "NavigationDrawerExample";
    }


    @Override
    protected ReactActivityDelegate createReactActivityDelegate() {
        return new ReactActivityDelegate(this, getMainComponentName()) {
            @Override
            protected ReactRootView createRootView() {
                return new RNGestureHandlerEnabledRootView(MainActivity.this);
            }
        };
    }
}
This RNGestureHandlerEnabledRootView will help you to swap Navigation Drawer using Touch Gesture like below
Note:- If you are using React-native version >0.60.0 or above then add following code in your index.js file
import { gestureHandlerRootHOC } from 'react-native-gesture-handler'

AppRegistry.registerComponent(appName, () => gestureHandlerRootHOC(App));
This will help you to swap Navigation Drawer using Touch Gesture like below, so you index.js look like
import {AppRegistry} from 'react-native';
import App from './App';
import {name as appName} from './app.json';

import { gestureHandlerRootHOC } from 'react-native-gesture-handler'

AppRegistry.registerComponent(appName, () => gestureHandlerRootHOC(App));
Output:-

Thank you.. 🙂


Asking questions are really nice thing if you are not understanding anything totally, however this piece of writing gives good understanding even.
Thank you 🙂
React native is tough a little bit.
But, When people have tutorials like this, they can quickly develop code for their project.
Nice tutorial!
Thanks a lot :), stay connected
Informative article, exactly what I was looking for.
Thanks a lot 🙂
Invariant Violation:
Native module cannot be null
updated the
import {createAppContainer} from ‘react-navigation’;
import {createDrawerNavigator} from ‘react-navigation-drawer’
import {createStackNavigator} from ‘react-navigation-stack’;
since the older is not supporting anymore.
Can you take a look at this
Okay will check and get back to you
Hi Sai, I have updated the project on react-native version 0.60.0, Please check the latest code
Basically you need not link libraries, React-native latest version support Auto-linking, That’s why you facing “Native module cannot be null” just unlink react-native-gesture-handler using the following command
react-native unlink react-native-gesture-handler
and add following line’s in your index.js
import { gestureHandlerRootHOC } from ‘react-native-gesture-handler’
AppRegistry.registerComponent(appName, () => gestureHandlerRootHOC(App));
Like!! I blog quite often and I genuinely thank you for your information. The article has truly peaked my interest.
Thanks a lot 🙂